If you want your business to expand and grow, you need a reliable online presence, and nothing shows credibility like a good website.
With Squarespace, you can easily make your online store or portfolio website with ready-made templates, but customization and flexibility are not Squarespace’s strong suits. As a result, many users go for a better and more customizable platform, WordPress.
- Squarespace VS WordPress
- Why You Should Consider Moving From Squarespace to WordPress
- Things to Consider Before Migrating from Squarespace to WordPress
- 6 Steps To Migrate From Squarespace to WordPress
Squarespace VS WordPress
While Squarespace is a famous website builder that can help you build your website – from portfolios to online stores – it’s not as customizable as its much more popular counterpart WordPress.
The lack of scalability in Squarespace limits the website owners when they want to customize and expand. As a result, they want to switch to a content management system (CMS) that offers highly flexible features for all types of websites. And we all know that that is precisely where WordPress excels.
If you’re not completely satisfied with your website on Squarespace, don’t worry, you’re not the only one. You can easily migrate your website from that platform to WordPress.
If you’re still unsure, let us explain why it would be in your website’s favour to migrate to a better platform.
Why You Should Consider Moving From Squarespace to WordPress
Although Squarespace is a decent all-in-one website building solution with a beginner-friendly environment, it doesn’t provide your website with a chance to reach its full potential. There are multiple reasons why you should consider moving your website from Squarespace to WordPress.
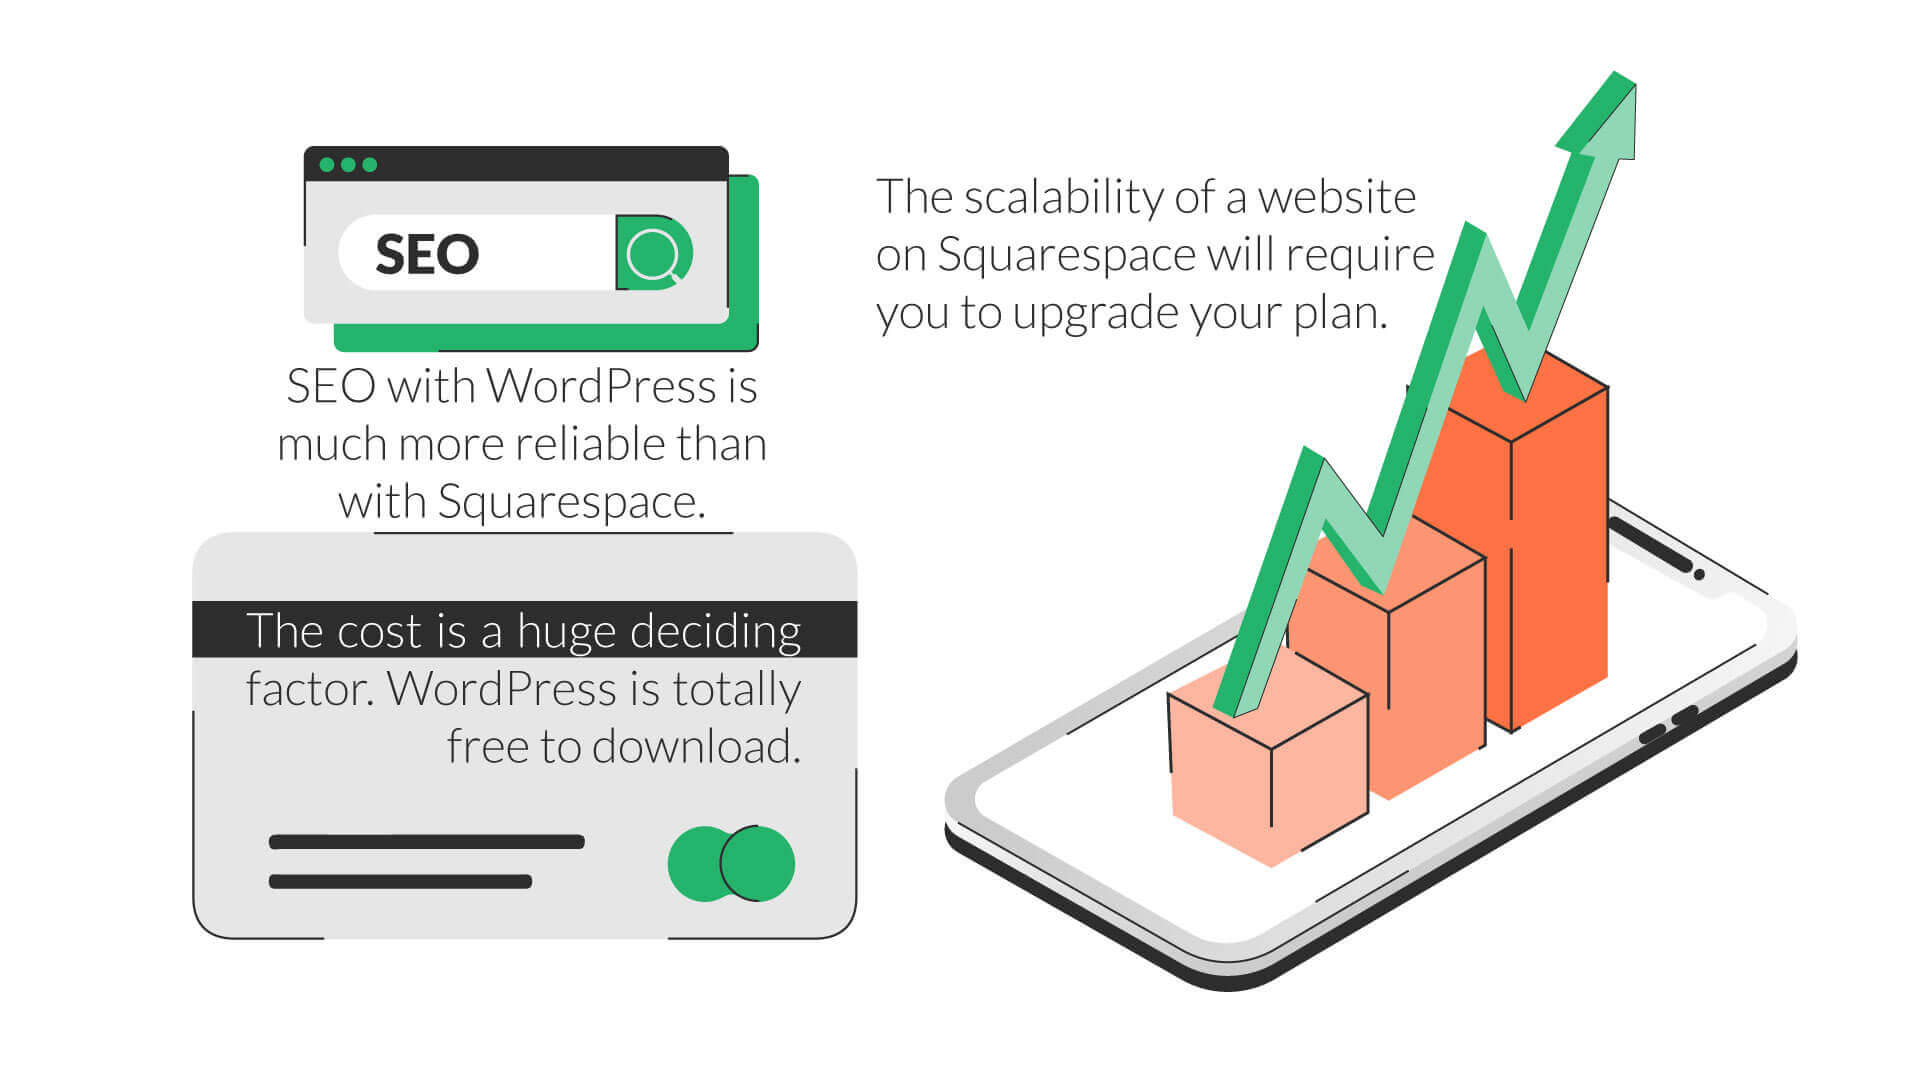
The scalability of a website on Squarespace will require you to upgrade your plan, which will charge you more money for additional features, most of which you will not be using. On the other hand, the self-hosted WordPress allows you to scale your website without any additional plan. You have to find what your website is missing and find the plugins with reliable ratings and features to fill that void.
Search engine optimization with WordPress is much more reliable than Squarespace. WordPress is written with a standard compliance code packed with many SEO-friendly features. For instance, with WordPress, users can set up clean permalinks to make it easier for visitors and search engines to know your site and its categories better.
The images can also be optimized for SEO in WordPress using alternate text for all images. The availability of vast SEO plugins in WordPress also helps improve your search engine result page (SERP) rankings. None of these features are available in Squarespace.
The cost is also a huge deciding factor. WordPress is free to download. You’ll bear the expenses of hosting and domain registration. We recommend you get managed WordPress hosting, which will take care of the WordPress technicalities, upgrades, and all the backend tasks for you, while you can focus on creating new ways to expand your website.
You can get hosting plans as cheap as $2/month with WordPress, whereas the initial Squarespace plan begins at $12/month.
It’s clear who wins here.
These reasons (though there are many more) should be enough to convince anyone that WordPress is a better, more elaborate, and more flexible platform. And if you want your website at Squarespace to expand and grow, it’s highly advised that you shift it to WordPress through an easy and smooth migration process.
However, before we get to that, let’s talk about a few things you need to consider before the migration.
Things to Consider Before Migrating from Squarespace to WordPress
The first thing you need to consider here is getting a web hosting plan. There are numerous hosting providers available out there, so do your research before deciding the kind of hosting you want.
Some things you need to look for in a perfect hosting provider are:
- Low cost
- Fast loading time
- High server uptime
- Optimal security
At HostPapa, we advise our clients to go for Managed WordPress Hosting, which fulfills the criteria of being the best WordPress hosting solution for you.
The next thing you should consider before migrating your website is getting a domain. You can either buy a domain name from a domain registrar or your hosting provider.
Now you’re all set for the migration process, so let’s get on with it.
6 Steps To Migrate From Squarespace to WordPress
Without further ado, let’s migrate your website from Squarespace to WordPress in six easy steps.
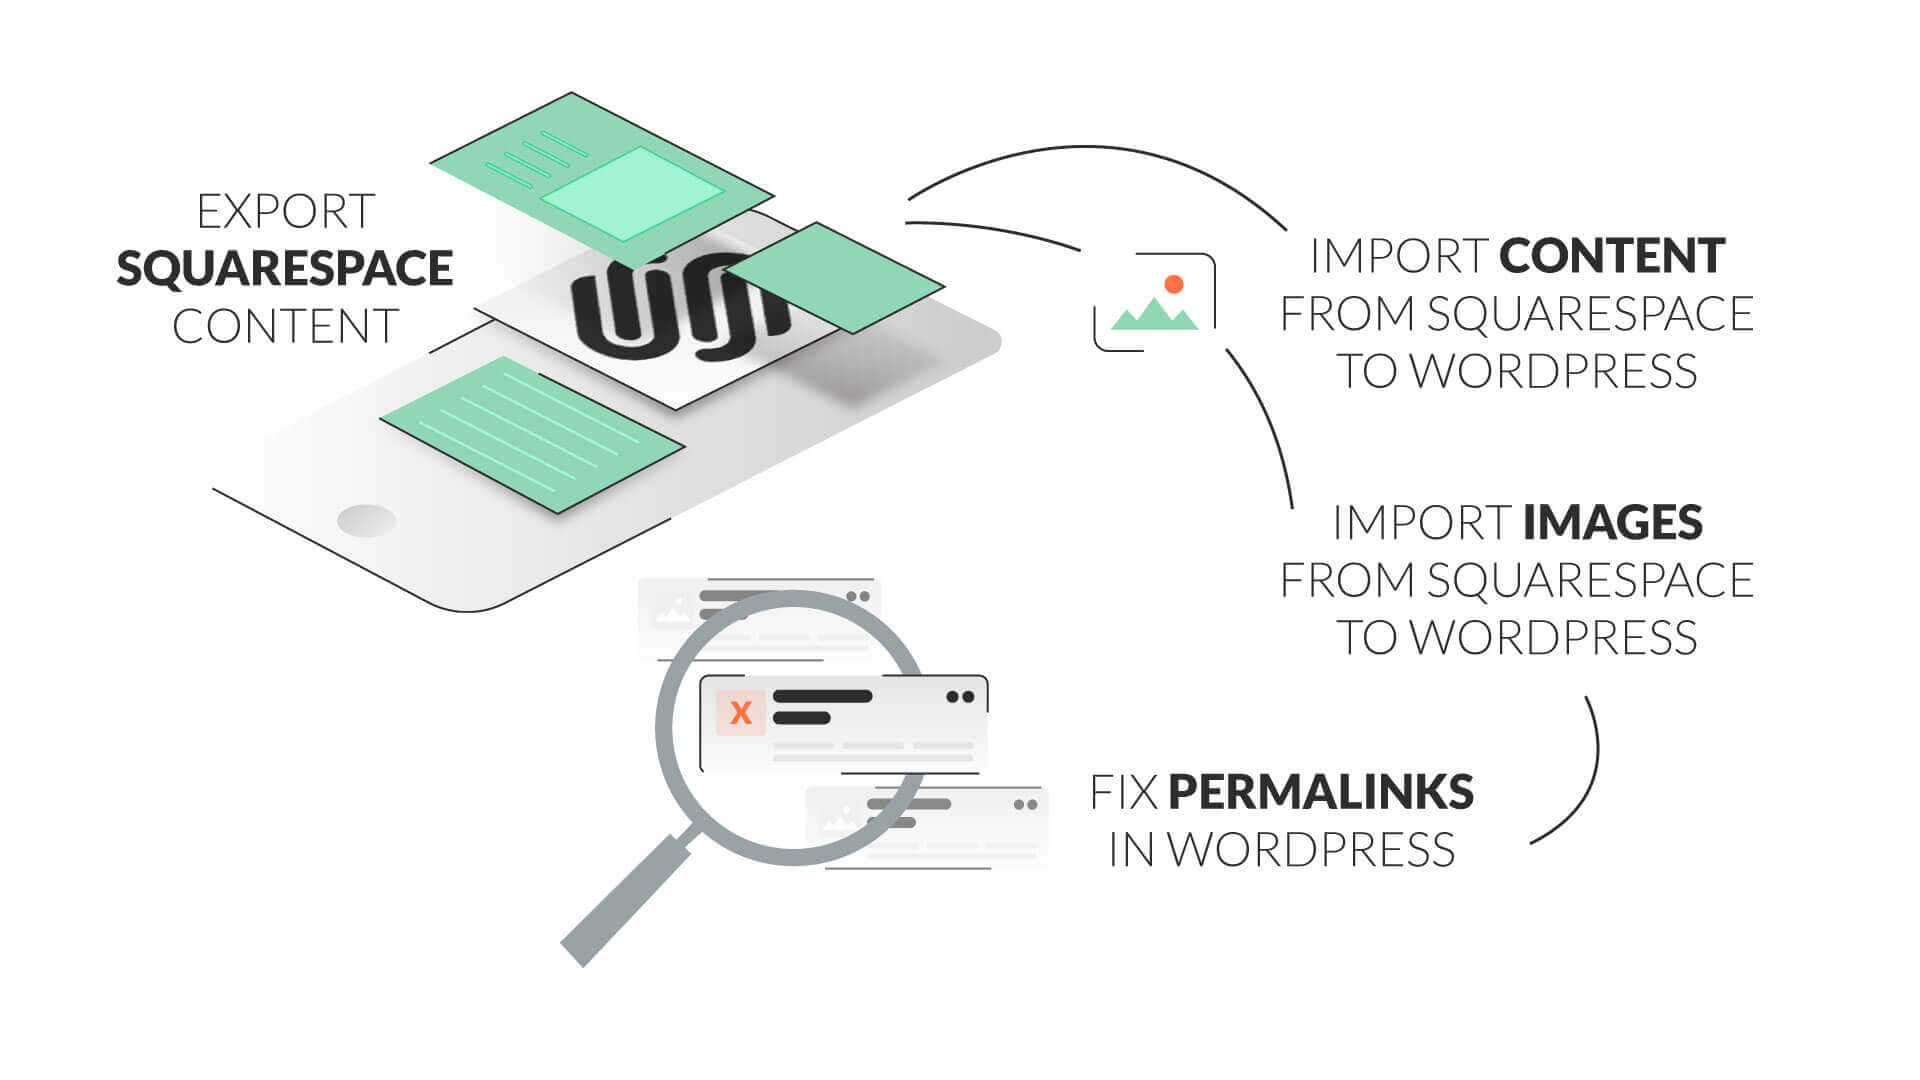
Step 1: Export Squarespace Content
The first thing you have to do in this process is export all of your website data from Squarespace. Unfortunately, Squarespace doesn’t allow all content to be exported automatically.
The introductory pages will be exported as WordPress pages, posts will be exported under one blog page as WordPress posts, and gallery pages with texts, images, and embed blocks will be exported automatically.
However, there are some things you need to export manually:
- Event, product, album, and index pages
- Drafts and folders
- Audio, video, and product blocks
- Style changes
- Custom CSS
- Multiple blogs
To export content manually, create a new page in WordPress from scratch and copy/paste all of Squarespace’s content on this page. In addition, you need to export the images manually too.
Apart from the manual export, below is a way to conduct the automatic export.
- Log into your Squarespace and access the website you want to export.
- On the website, click on Settings on the left-hand menu bar.
- Scroll down and locate Advanced, then click Import / Export.
- Select Export, followed by WordPress.
- If you have more than one blog on your website, the Select Primary Blog window will open up. Choose the blog from the drop-down menu and press Export.
- Once Squarespace creates a “.xml” file for you, download it.
You will have the export XML file in your hand to proceed to the next steps.
Step 2: Import Content from Squarespace to WordPress
For this step, you need WordPress installed, either through WordPress.org or from your hosting provider.
Usually, hosts provide you with an auto WordPress installer. HostPapa provides a one-click WordPress installation that can download WordPress on your computer.
Once WordPress is installed, follow the steps below to import its content.
- Log in to your WordPress dashboard and head to Tools > Import.
- With the XML file, you can use the default importer of WordPress. So, go to the WordPress section and click on Install Now.
- Once the installation process is complete, select Run Importer.
- Select the file you exported and click on Upload file and Import.
- Now you will have to configure the import settings. It will ask you to assign an existing admin user or create a new one. You can also download and import file attachments if you check the box. Take care of these settings as you want and click Submit.
- If everything works out, the success message will be displayed, and all of your content will start appearing in the WP Posts section.
Check the site to see if all the content is there and if nothing important is left behind in the import.
Step 3: Import Images from Squarespace to WordPress
As stated above, you need to images manually from Squarespace to WordPress. There are two ways to migrate all of your images to WordPress: manual migration and through a plugin. Since manual migration takes a lot of time, we’ll guide you through the plugin migration, for which you will have to get the Auto Upload Images plugin.
This plugin searches for image URLs in your old Squarespace website and transfers them automatically to the WP media library. All you have to do is install the plugin.
If you’re not familiar with the plugin installation process, read here about installing plugins in WordPress.
Once the plugin is installed and activated, follow the steps below to migrate the images to WordPress.
- Go to Posts and select the posts you want to update with images.
- From the Bulk Actions drop-down menu, choose Edit, then click on Apply.
- A new window will pop out. Click on Update.
- All of the images from Squarespace will be uploaded to your WordPress media library, and your posts will be updated automatically.
Step 4: Point Your Squarespace Domain to Your New WordPress Website
If you’ve been using a custom domain for your old Squarespace website and want to continue using the same domain on WordPress (which we recommend you do), you’ll have to change the domain’s nameservers.
Nameservers direct the traffic from your domain name to the host’s server, enabling the host to display your site to them. Now that you’re moving to a new platform with a new hosting provider (because hosts usually don’t allow going on a different platform), you must point your domain nameservers to the new host to keep your site accessible to the visitors.
Changing your nameservers depends upon how you have registered your domain in the first place. If you got it from a domain registrar, modify the nameservers by accessing your Squarespace DNS settings and changing the nameservers from the hosting panel.
Alternatively, if your domain was registered through a hosting company, they’ll have to update your DNS settings from their system.
Step 5: Fix Permalinks in WordPress
If two platforms use different link structures – which is the case with WordPress and Squarespace – then the migration can result in broken URLs, which would result in “404 Not Found” errors, impacting your traffic negatively.
The server doesn’t know that the page the surfer is trying to access has been moved to a new location or platform. To inform the server about this relocation, we need to adjust the permalinks of your new website.
Squarespace uses the year/month/day/post-name as its URL structure for blogs with prefixes like blog-1.
The average URL of a Squarespace site looks like this:
https://www.yourdomain.com/blog-1/2020/1/1/post-example
The URL structures of WordPress are quite different. Therefore, they need to be changed. To do that, follow the steps below.
- Log in to your WP dashboard and go to Settings > Permalinks.
- Select the Day and Name option for the structure, as it’s the most similar to Squarespace. However, the best URL structure for WordPress is Post Name.
- Go to the Custom Structure field and add the blog-1 prefix in front of it. It should look like this:
/blog-1/%year%/%monthnum%/%day%/%postname%/
- Hit Save Changes.
Now, the system knows there has been a change of location, so it would redirect the visitors from Squarespace to WordPress whenever they access your website, not harming your website traffic.
Step 6: Get Started With WordPress
Now that you’ve successfully migrated your Squarespace website to WordPress and have made all the relevant technical adjustments, you are ready to work with WordPress. It’s time we tweak your WordPress website a bit to make it look appealing to the eyes.
The first thing you have to do is to install a new theme. There are many themes in the WordPress theme directory, so it may be hard to choose. For extra help, read our guide to choosing the best WordPress theme.
If you have a budget, you can also consider investing in premium WordPress themes that offer many customization options.
To learn as you grow with WordPress, don’t forget to join the WordPress community, where WordPress enthusiasts, developers, and users help each other solve problems related to the use of WordPress.
That’s it! The process of migrating your website from Squarespace to WordPress is complete.
Summing It Up
While Squarespace is a quick, easy, and beginner-friendly website building solution, it lacks flexibility and customization, creating limitations for the users to expand their website. On the other hand, WordPress offers numerous features with flexible customization that can help anyone with any website grow as much as possible.
In this guide, we showed you how the two platforms differentiate from each other, why WordPress is better than Squarespace, why you should consider this migration, what you have to do before you start this migration, and how to get done with this migration in just six easy steps.
We hope this guide helps you craft a perfect site on WordPress.